14. REPROGRAMMING THE EMBEDDED LINUX IMAGE
This page describes the steps to be followed to update the BSP for the Floyd carrier board.
Jetson modules run a customized Linux operating system enhanced to work with the multi-core ARM processors and the GPU features unique to the module. The Linux operating system, referred to here as a board support package (BSP), is programmed into the built-in eMMC flash memory on the module. The stock module coming from distribution does not have any software programmed into it and must be programmed prior to use.
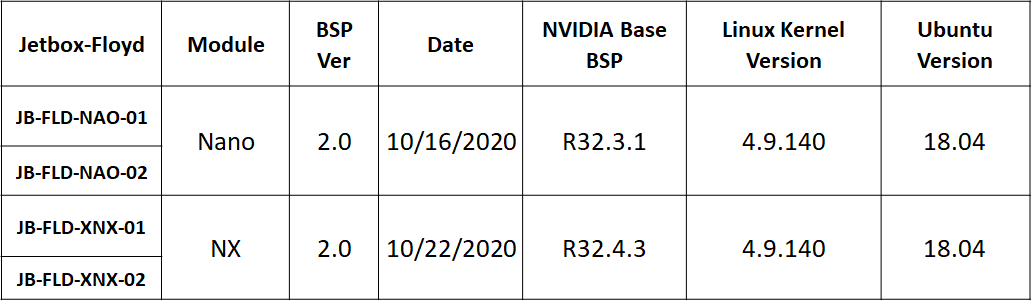
Diamond offers a separate BSP for both Nano and NX modules running on Floyd. These BSPs are based on the NVIDIA stock BSP R32.3.1 & R32.4.3 for Jetson Nano & Xavier NX respectively released by NVIDIA.
The following table shows the latest Diamonds BSP installed into the corresponding modules along with other details:
The following is a list of interface feature enhancements added to the stock BSP:
Added support and utilities for RS-232/422/485 serial port interfaces
Added driver support for E-Con cameras
Added utilities for camera connector interfaces, J12, J13, and J14
Added USB2.0 port 1 Host mode support
Added utility for I2C GPIO expander
Added support for MicroSD Card socket
Added User LED control
The Diamond Systems BSP is released as a compressed tar.gz file, that can be unzipped on a Linux Host Machine and flashed onto the Jetson Nano and Xavier Modules.
14.1 Hardware Setup
To update the image on the module, the Floyd carrier board must be set to Recovery Mode.
Remove the TOP heat spreader plate to access the jumpers on the Floyd carrier board
Remove the jumper on H from JP3 & mount it on D on JP3 as shown in Section 7.3 JP3: Select USB2.0 - 1 Mode to operate the USB2.0 port 1 as a device
Connect the USB 2.0 Top Port 1 J4 to the Host Linux PC using an USB A2A cable.
Start the system by pressing the RECOVERY (SW1) button while powering up the board.
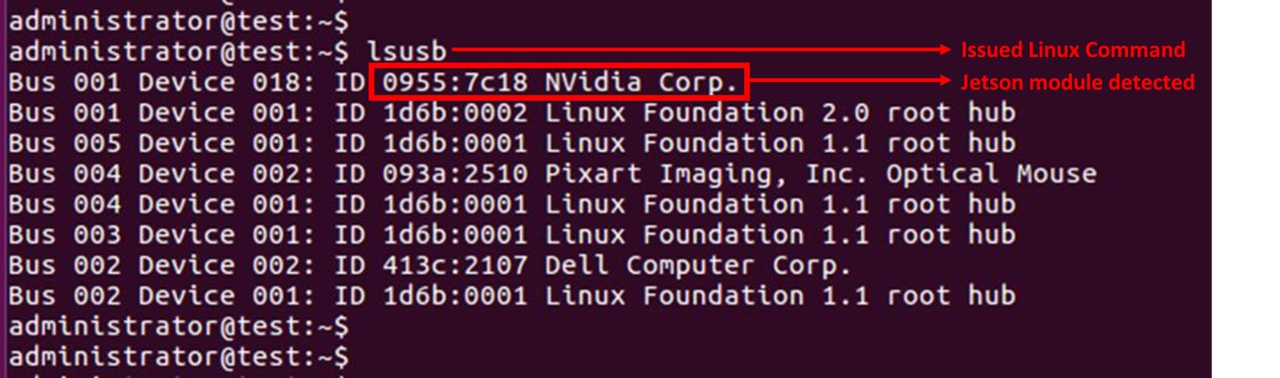
To verify that board is in recovery mode: In the Host PC running Ubuntu version 16.04 terminal application. Issue the following command:
lsusb.
If the module successfully enters into RECOVERY MODE, the terminal in the Linux host machine should list Nvidia Corp device. See illustration below:
The Terminal application will display the NVIDIA device listed under USB devices as depicted in the screen above that confirms that the system is in Recovery Mode and the module is ready to be flashed with the BSP Image.
14.2 Software Setup
Follow the steps provided below corresponding to the installed module.
14.2.1 Flashing Jetson Nano Module
Download the BSP Image file DSC-Floyd-Nano-release-2.0-20201016.tar.gz, from the FTP site and copy it to a directory on the Linux Host Machine.
Alternatively, the file may be copied to a different source such as the Desktop.
2. Issue the following command to navigate to the directory containing the downloaded file:
cd ~/Desktop
To unzip the copied Image file:
3. Issue the following command depicted below.
sudo tar -pxvzf DSC-Floyd-Nano-release-2.0-20201016.tar.gzx
It may take a few minutes for the file to unzip.
NOTE: The tar.gz file name is liable to change according to the version and release date.
To switch to the directory where the file has been extracted:
4. Issue the following command as depicted below:
cd Linux_for_Tegra
To flash the Jetson Nano Module:
5. Issue the following command as depicted below:
sudo ./flash.sh jetson-nano-emmc mmcblk0p1
Do not interrupt or interfere with the USB connectivity or the power supply to the carrier board until the flashing procedure is complete
The flashing process will take 15-20 minutes to complete.
The system will automatically Reboot when the flashing process is complete.
6. Shutdown the system and remove the recovery mode USB cable connection.
7. Remove the jumper on D from JP3 & mount it on H on JP3 as shown in Section 7.3 JP3: Select USB2.0 - 1 Mode to operate the USB2.0 port 1 as a HOST
8. Switch on the power supply; now the system should boot to Linux Desktop
14.2.1 Flashing Jetson Xavier NX Module
Download the BSP Image file dsc-floyd-nx-release-2.0-20201022.tar.gz from the FTP site and copy it to a directory on the Linux Host Machine.
Alternatively, the file may be copied to a different source such as the Desktop.
Navigate to the directory containing the downloaded file, by using the following command:
cd ~/Desktop
To unzip the copied Image file:
Issue the following command depicted below:
sudo tar -pxvzf dsc-floyd-nx-release-2.0-20201022.tar.gz
It may take a few minutes for the file to unzip.
NOTE: The tar.gz file name is liable to change according to the version and release date.
To switch to the directory where the file has been extracted:
4. Issue the following command as depicted below:
cd Linuxfor Tegra
To flash the Jetson Xavier NX Module:
5. Issue the following command as depicted below:
sudo ./flash.sh jetson-xavier-nx-devkit-emmc mmcblk0p1
Do not interrupt or interfere with the USB connectivity or the power supply to the carrier board until the flashing procedure is complete
The flashing process will take 15-20 minutes to complete.
The system will automatically Reboot when the flashing process is complete.
6. Shutdown the carrier board and remove the recovery mode USB cable connection.
7. Remove the jumper on D from JP3 & mount it on H on JP3 as shown in Section 7.3 JP3: Select USB2.0 - 1 Mode to operate the USB2.0 port 1 as a HOST
8. Switch on the power supply; now the system should boot to Linux Desktop
With the BSP package installed, the Jetbox-Floyd is ready for application development.
Last updated